Over the last year, I've thought about reviving this project many times, but I knew that it wasn't going to be pretty. There were a lot of problems with it when I put it away and I kept envisioning the nightmare that quilting on a jacked up quilt top was going to be. The positives were that since beginning the original quilting, I had since purchased a walking foot for my sewing machine and completed a ton more quilting and sewing projects. I knew this would help with some of the pulling and puckering issues...but nothing was going to erase the poor sewing on the top of the quilt. And like most things, it pays to have the right equipment for the job and the quilting ended up going much smoother than I had envisioned.

A word of warning for those attempting to make this project...it's a bit strange at least in my limited experience. You don't actually piece the top together like you would for a normal quilt. You sew a large piece of muslin together then attach the patchwork top pieces according to the pattern. Then you (basically) applique another layer of smaller patchwork pieces to the throw top. Then you sew it all together. I'm sure you can see now all the room for error in this project when you have a novice sewer without the proper equipment.
Another issue that caused even more inconsistency problems was that I hand cut each fabric piece with scissors...not a rotary cutter and mat. I also pin basted the throw together...which I will never do again. While I'm generally one for the less gimicky option when it comes to things, I really do love my adhesive basting spray. It keeps things so smooth and wrinkle free, which really helps in eliminating puckers and other problems.

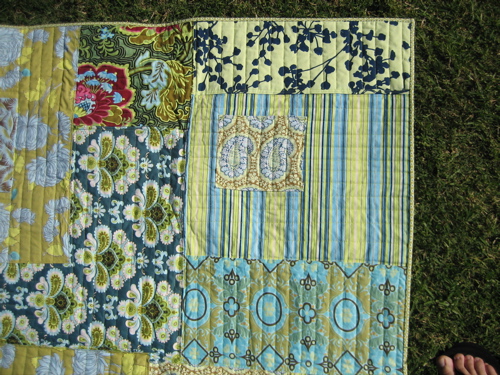
Now, lets talk about the fabric choices for a moment. I saved a ton of money on these. Mainly because I actually figured out how much I needed rather than going by the generous recommendations in the book. This saved me about 1/2 of the fabric requirements! I also got them online and on sale. I did my best to pick out things that would work together, but there are a few that I would not have put together if I had been selecting these in person. The good thing is that because they came from an Amy Butler line that was current at the time (Belle), the colors do coordinate. For example, the same robin's egg blue is seen in almost all the prints. However, there are a couple 'spotlight' fabrics that dominate a bit. I'm not worrying about this issue, since the patchwork nature of the throw is more hodge-podge than matchy-matchy.
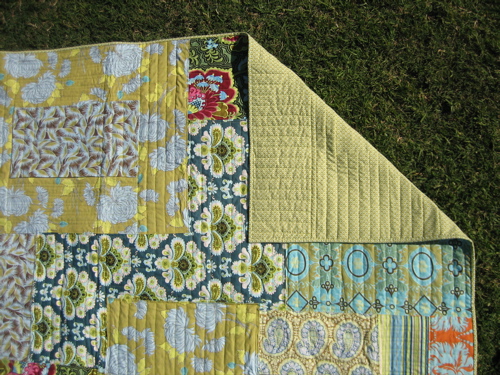
As for the quilting itself, this is where I stopped looking at the pattern. I just randomly quilted lines on each piece of fabric in alternating directions using the guide bar on my walking foot. In a couple places, I mixed it up even more and made slanting quilt lines or lines in alternating sizes. I didn't worry about being crazy precise here, but the guide bar does help you fake symmetry really well ;) Finally, I backed and bound the throw with the same fabric. You can see a better representation of this particular fabric here.
This is a project that I am happy to be done with. Given all the problems, I am very happy with how it came out. I'm also very happy with the leftovers that I am now in the process of turning into bibs...wonderful bibs of many colors!
11 comments:
Hello-
I love Amy Butler! Her website is wonderful, her philosophy of business is wonderful, and your quilt is just as wonderful.
I have lurked your site for a many months now and have never commented but your lovely quilt inspired me to.
Basting spray? that sounds so awesome!!! the laste quilt I made I hand basted with needle and thread....what a pain!
I think your quilt came out beautiful! Definitely worth the headaches and extra effort! I really love the uniqueness of patchwork.
It's so pretty! You should be very happy with it!
I love the way it turned out! See...there was a reason you waited to finish it! :)
L love everything about this quilt: the fabrics, the placement and the quilting. Great job!
Oh the Love! It is so cute. As a non-sewing person, I have longed to be able to create something using her fabric.
Despite the construction issues with the project, it is a gorgeous quilt!
I think it's lovely, and it sounds like it was a bit of a learning experience (which is good, if you ask me) :)
I love the quilting you did. I think it nicely conceals any weirdnesses that resulted from the strange construction.
That sounds like a neat way of piecing together a quilt. I have been wanting to try this pattern. It is gorgeous.
I found your blog by googling "amy butler patchwork throw" and I am so happy to hear you thought this project was strange! I started mine last year, but after the weird patchwork process and the quilting (which I have not finished yet) it's sitting on the floor in a room... somewhere.
Yours is GORGEOUS, and makes me think that I should pull mine out and finish it...
Post a Comment